150 Special restoration

If you want to tell us about or ask about a standard spec or restoration project....post it here.
Piatti
registered user
Posts: 65
Joined: Wed Jan 07, 2009 6:11 pm
Location: Deeside, Flintshire
Contact:

This is my attempt to restore a 150 Special, frame and engine numbers indicate it to be 1965.

Purchased in June 2006 not knowing anything about restoring scooters I intended to try and attempt to do as much as I could myself.

I have spent the last year or so in fits and starts attemping to sort out the bodywork and paint. Cold weather and lack of time meant this was a long process.

Anyway here's a quick update
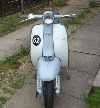
A couple of the scoot when first purchased in 2006, it wasnt running by the way...

Image

Image

Here's some of the stripdown

Image

Have'nt looked at engine yet....

Image

Etch prime in garage last year

Image

Image

Filler primer a while later

Image

Finally managed to finish the 2 pack solid colour last week

This is its current state

Image

Image

Image

Image

I am planning on making a start on the rebuild and have ordered some bits and pieces to start me off, so I will update very soon. I must warn everyone it will be a long process and will most probably bore the the tits off some of you with questions you may have heard and answered before.....

Anyway thanks in advance

Piatti
storkfoot
registered user
Posts: 1154
Joined: Thu Jan 08, 2009 12:08 am
Main scooter: '70 GP150 [TS1 225]
Location: Merseyside
Contact:

Bought from Barry Turner?
Piatti
registered user
Posts: 65
Joined: Wed Jan 07, 2009 6:11 pm
Location: Deeside, Flintshire
Contact:

Yes it was, it was one of two he had for sale at the time

Do you remember seeing it outside his shop ?

I tried to pick the best one......
storkfoot
registered user
Posts: 1154
Joined: Thu Jan 08, 2009 12:08 am
Main scooter: '70 GP150 [TS1 225]
Location: Merseyside
Contact:

I do. Think it came from Italy without panels and Barry had to get a set. Good luck anyway
Piatti
registered user
Posts: 65
Joined: Wed Jan 07, 2009 6:11 pm
Location: Deeside, Flintshire
Contact:

Heres a quick update, carried the frame downstairs and managed to fit a couple of bits today

Image

Fitted the stand and splashplate on plus strengthing plates

Image

Image

I havent fitted the spring on yet, its just clipped on and hanging down, if anyones got any tips for fitting please let me know..... :idea:

Next was the Seat latch

Image

Image

If anyones got some fork compressors in the Deeside, Flintshire area and is willing to lend them out for a couple of days please contact me ;)

cheers

Piatti
User avatar
Dazza
Posts: 534
Joined: Wed Jan 07, 2009 8:48 pm
Main scooter: S3 LI Rapido 225
Location: Newark on Trent
Contact:

Fit washers between each coil of the spring and fit - then remove the washers after---looking good so far matey ;)
If it aint broke.........tinker with it.....
Piatti
registered user
Posts: 65
Joined: Wed Jan 07, 2009 6:11 pm
Location: Deeside, Flintshire
Contact:

fitted the rear light gasket and housing....

Image

first I scrapped away the paint to make way for the earth tag

Image

the gasket was a good fit, it was a casa lambretta one, I bought a scootrs one originally but it didnt sit right so I got the casa one

Image

earth tag fitted ...

Image

Thanks to the tip from Dazza I fitted the stand spring, gripping the spring in a vice and bending it whist pushing 1 pences in extends the spring...

Image

Then simply attach spring and fully extend on the stand, the 1p's should come out

Image

I hope to re-spring the seat at the weekend.....

Piatti
PanosK
registered user
Posts: 103
Joined: Wed Jan 07, 2009 3:57 pm
Location: Volos Greece
Contact:

Keep up the good work.
Very well so far.
http://vespaclubvolos.com
http://www.lambretta-club.gr
Li 150 II - Li 150 III - TV 175 III - SX 200 - DL 150 - Lui 50 - Rally 200 - Vespa 50s
User avatar
sideout
registered user
Posts: 348
Joined: Wed Jan 07, 2009 10:45 pm
Main scooter: SX150/GP Muggy/LiS3 Avanti TT3
Location: Weymouth
Contact:

Piatti wrote:I hope to re-spring the seat at the weekend..... Piatti
Hope you've got enough pennies in the piggy bank to do the seat springs :lol: :lol: :lol:

Cracking job matey! Keep posting updates 8-)
Piatti
registered user
Posts: 65
Joined: Wed Jan 07, 2009 6:11 pm
Location: Deeside, Flintshire
Contact:

Finally got round to re springing the seat today

Had the seat frame powdercoated ages ago, the seat rebuild kit is from scootrs and the springs are already powdercoated black

The 18 springs seem to be 2 different sizes with half being slightly shorter

Image

Image

Its not too bad untill you try and fit the second set of 9 springs, then you need arms like 'Garth' as your trying to stretch springs to the max which are already attached to the first set.....

Image

I had to trim the seat catch thumb button to make it fit as it slides forward. The thumb button is meant to stop a hole rubbing through your seat cover

Image

I have a Noemi Rosa seat, I originally bought a set of Giuliari rubber seat bungs, this type of bung doesnt fit, the diameter is too big for the holes in my Noemi Rosa

Image

This is the correct type of seat bung for a Noemi Rosa, one piece with 2 push in fixings

Image

Image

More to follow...........

Piatti
Post Reply Previous topicNext topic
  • Information
  • Who is online

    Users browsing this forum: No registered users and 6 guests