I painted my GP Cutdown a few weeks ago and thought you might be interested to hear how I got on. This was the first time I've used a spray gun, compressor and professional paint.
I bought 2 pack paint from a guy on the Belgian Lambretta club forum, 75 euro for 1 litre of paint, 1 litre of clear coat, 500ml of thinners and 500ml of hardener which is almost enough for two coats of each. I got a petrol blue from Renault Clio Sport which is slightly metallic and pearlescent.
My compressor was a medium sized model from Makro cash and carry, approx 120 euro fitted with automatic pump, pressure gauges and two outlets.
Spray gun was also from Makro, 45 euro. It's a "car touch up" gun which I think means it probably can't deliver enough paint to spray the large areas of a whole car but seems fine for a scooter.
I spent a few weeks gathering the following materials before starting
Cellulose thinners, 5 litres from a DIY shop for cleaning parts before painting to remove finger print grease and also for cleaning mixing pots and the spray gun after use.
4 x plastic measuring jugs half litre size.
Wooden chop sticks for mixing.
Paper boiler suit.
Lots of newspaper, I collected copies of the Metro free paper from the train.
Large decorators sheets to create a booth in the garage.
Masking tape.
Butchers hooks to hang components for painting.
3M mask for paint and varnish, double filter which cost 30 pounds from the UK (B&Q).
A second cheaper 3M mask for my assistant, he was not right up close to the paint all the time.
Preparation of parts, it took me a long time to strip everything by hand (next time I will sand or bead blast everything if I can find somebody to do it). I used normal cellulose primer and primer filler on the frame to fill some of the pits and scratches. My frame and forks were yellow and the rest grey, unfortunately you can see a difference through the paint. Even so this amount of prep was not really good enough and small runs in the filler show through the paint, places where I had not filled or filled too much also showed through. The prep of the primer is key to a good finish.
I hung the big sheets in my in-laws garage, pinning them to the rafters to create a square room. Then laid the newspaper on the floor. I strung the smaller parts across this space, hanging each one from a wire using the butchers hooks and then hung the frame from a rafter. The forks were clamped in a workmate so that they could be rotated during painting. The spray gun pushes out a lot of paint, much more than an aerosol can so there is a lot of mist in the air (keep your brother in laws Ducati well away!). The 2 pack appeared to be thicker than cellulose from a can so I saw fewer runs compared to other small jobs I've done. I did the first coat of paint quite lightly to get a feel for the gun, after a while I pulled the trigger all the way to put on a thicker coat.
I mixed the paint with the following ratio :-
Paint or clear coat + 50% hardener + 10% thinners
I used 300ml of paint or clear coat + 150ml of hardener + 30ml of thinners. Which gives more or less half a litre of paint each time and means you can use half litre mixing jugs (and if you have to stop for whatever reason you only loose half a litre).
Same mixture for the clear coat. I applied two coats of paint (2 x the mixture above), then waited an hour, cleaned out the spray gun with cellulose thinners before applying two coats of clear coat. Here I ran out of hardener so had to mix less on the final coat.
Lessons learnt
Prep of primer is key to a good finish (PPPPPP - Proper Preparation Prevents p155 Poor Performance)
Good lighting is essential, some places got only one coat of paint as I just couldn't see very well.
The warmer the environment the quicker the paint will set. I painted in an unheated garage at 5 to 8 degrees and after 24 hours the surface was dry to the touch but you could still scrape it off with your finger nail. I brought all parts indoors to dry in the warm house. It took about a week to fully harden.
The finish looks good but when you look closer you can see runs and pits.
There are some good "amateur" guides to painting with 2 Pack here :-
http://freespace.virgin.net/tommy.sandham/twopack.htm
http://www.renault4.co.uk/gordini-primer.htm
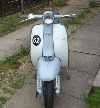
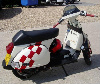
Here are some before and after pictures, it's really hard to get a close up view. The colour looks dark green indoors but comes alive in direct sunlight.


It's all more or less together now although the frame is still in the attic. I haven't yet found a space downstairs in our little house to fit the engine.


Should be ready in time for the Antwerp Custom Show in March.
Best regards
Ben