
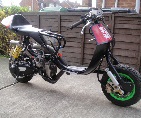
my first ever scooter build. cagiva mito 125 engine
had a bike fail an mot as I had done the same .. the beam pattern was scattered / out of focus .. don't know about hid lights but my guess was that the filament in the new bulb needs to be in the same place relative to the reflector
Its in bits scooter club: www.facebook.com/groups/132415046859320
-
tonydevon
- registered user
- Posts: 553
- Joined: Wed Jun 08, 2011 12:26 pm
- Main scooter: '71 GP125
- Location: Northam, Devonshire
- Contact:
yeah this is more of a, use in between MOT's thing LOL
its a fail, HID need clear glass and special reflector, but I love the whine it makes, will match the powervalve cycle noise nicely, also the crisp white light, combined with 3.1A current
might just fit a nice bright halogen into the GP headlight, probably bright enough as it will have battery and proper charging etc
heavy is good, heavy is reliable, and if it does fail, hit them with it!!!
-
tonydevon
- registered user
- Posts: 553
- Joined: Wed Jun 08, 2011 12:26 pm
- Main scooter: '71 GP125
- Location: Northam, Devonshire
- Contact:
WOW cant beleive its been this long since I put anything on here.
in truth I didnt touch it for a good while, just lost interest and motivation, got 2 other builds, a bike and a trike on the go, but as luck would have it the guy Im buildiing the GSXR chop for is more interested in this and so I started doing bits again
managed to get some money together and buy the scomadi shocks that I lusted after for so long, this spurred on my interest also and I been doing a few bits here and there.
pics and more info later
heavy is good, heavy is reliable, and if it does fail, hit them with it!!!
-
tonydevon
- registered user
- Posts: 553
- Joined: Wed Jun 08, 2011 12:26 pm
- Main scooter: '71 GP125
- Location: Northam, Devonshire
- Contact:
my lush shocks
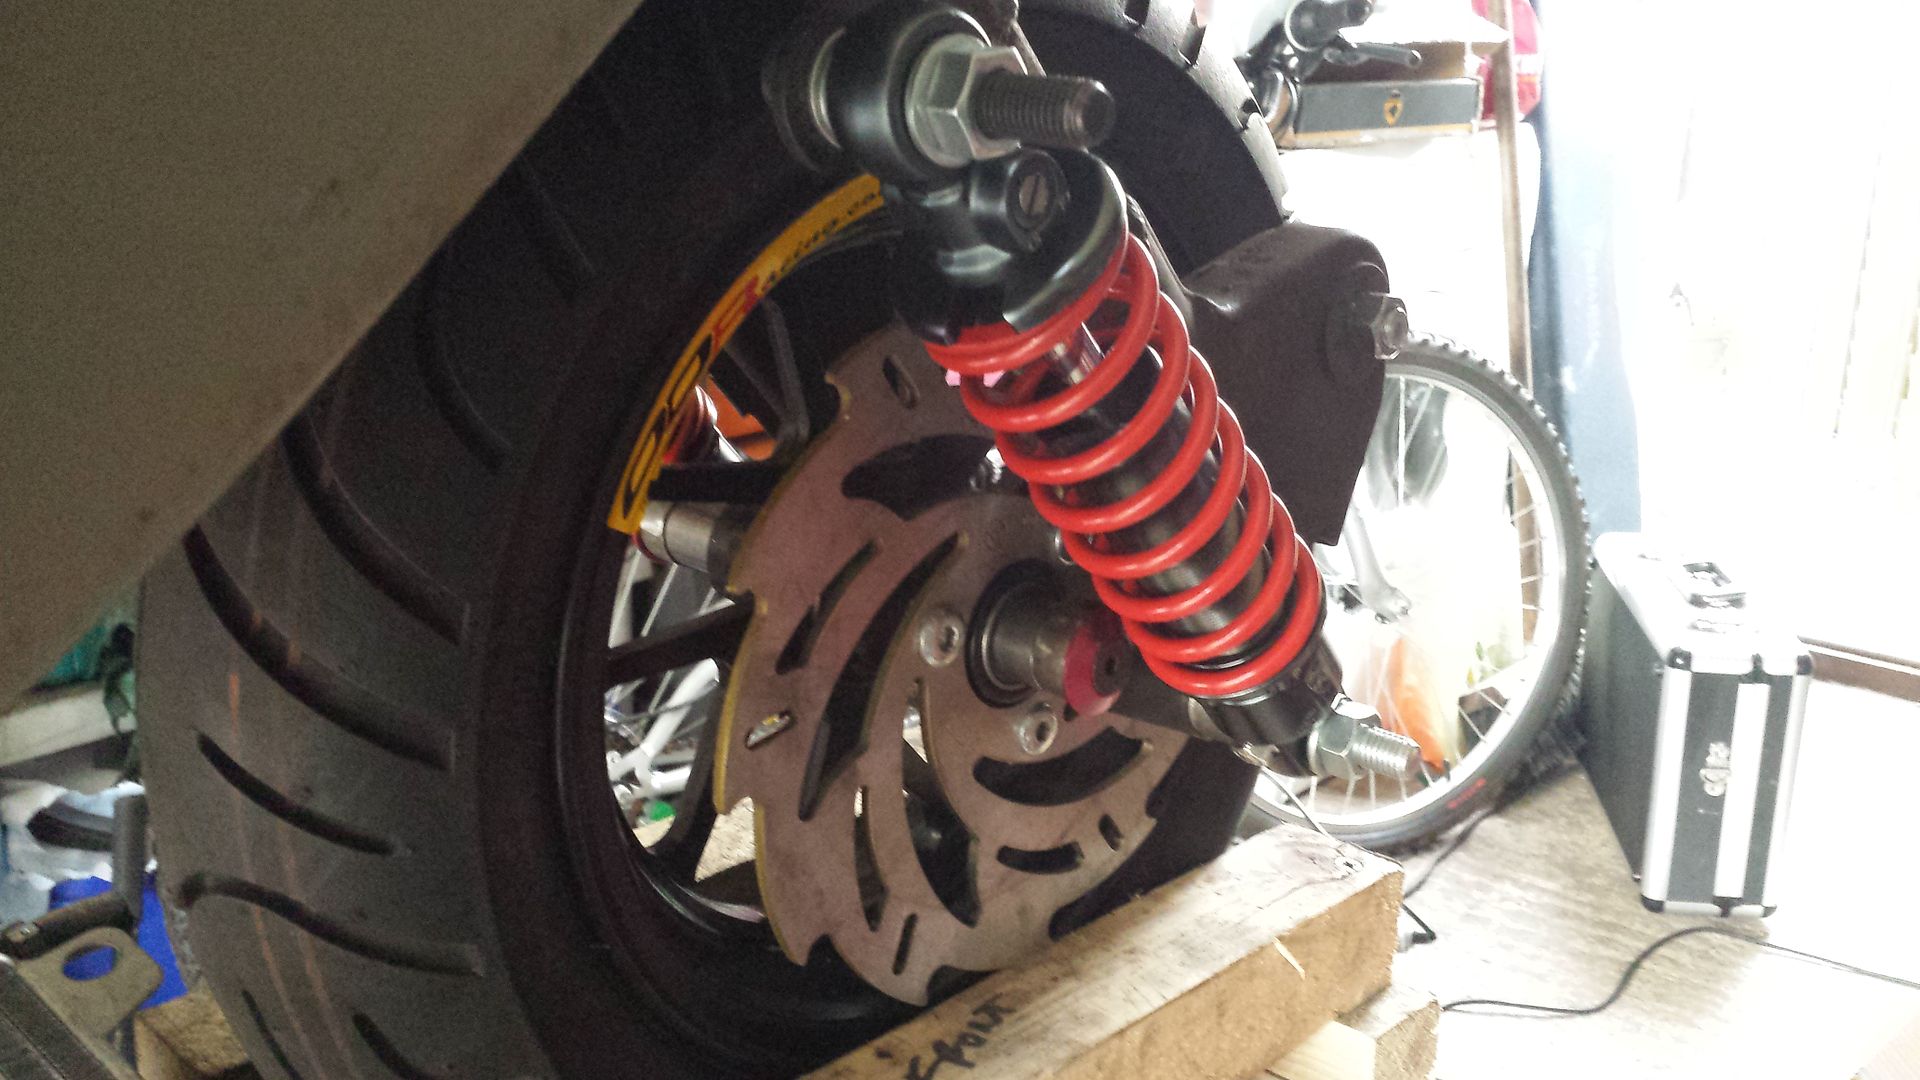
220mm front disc, have a 4 pot caliper that Im currently drawing up the carrier for.
Im going with a particular colour on this build, try and guess what it is LOL

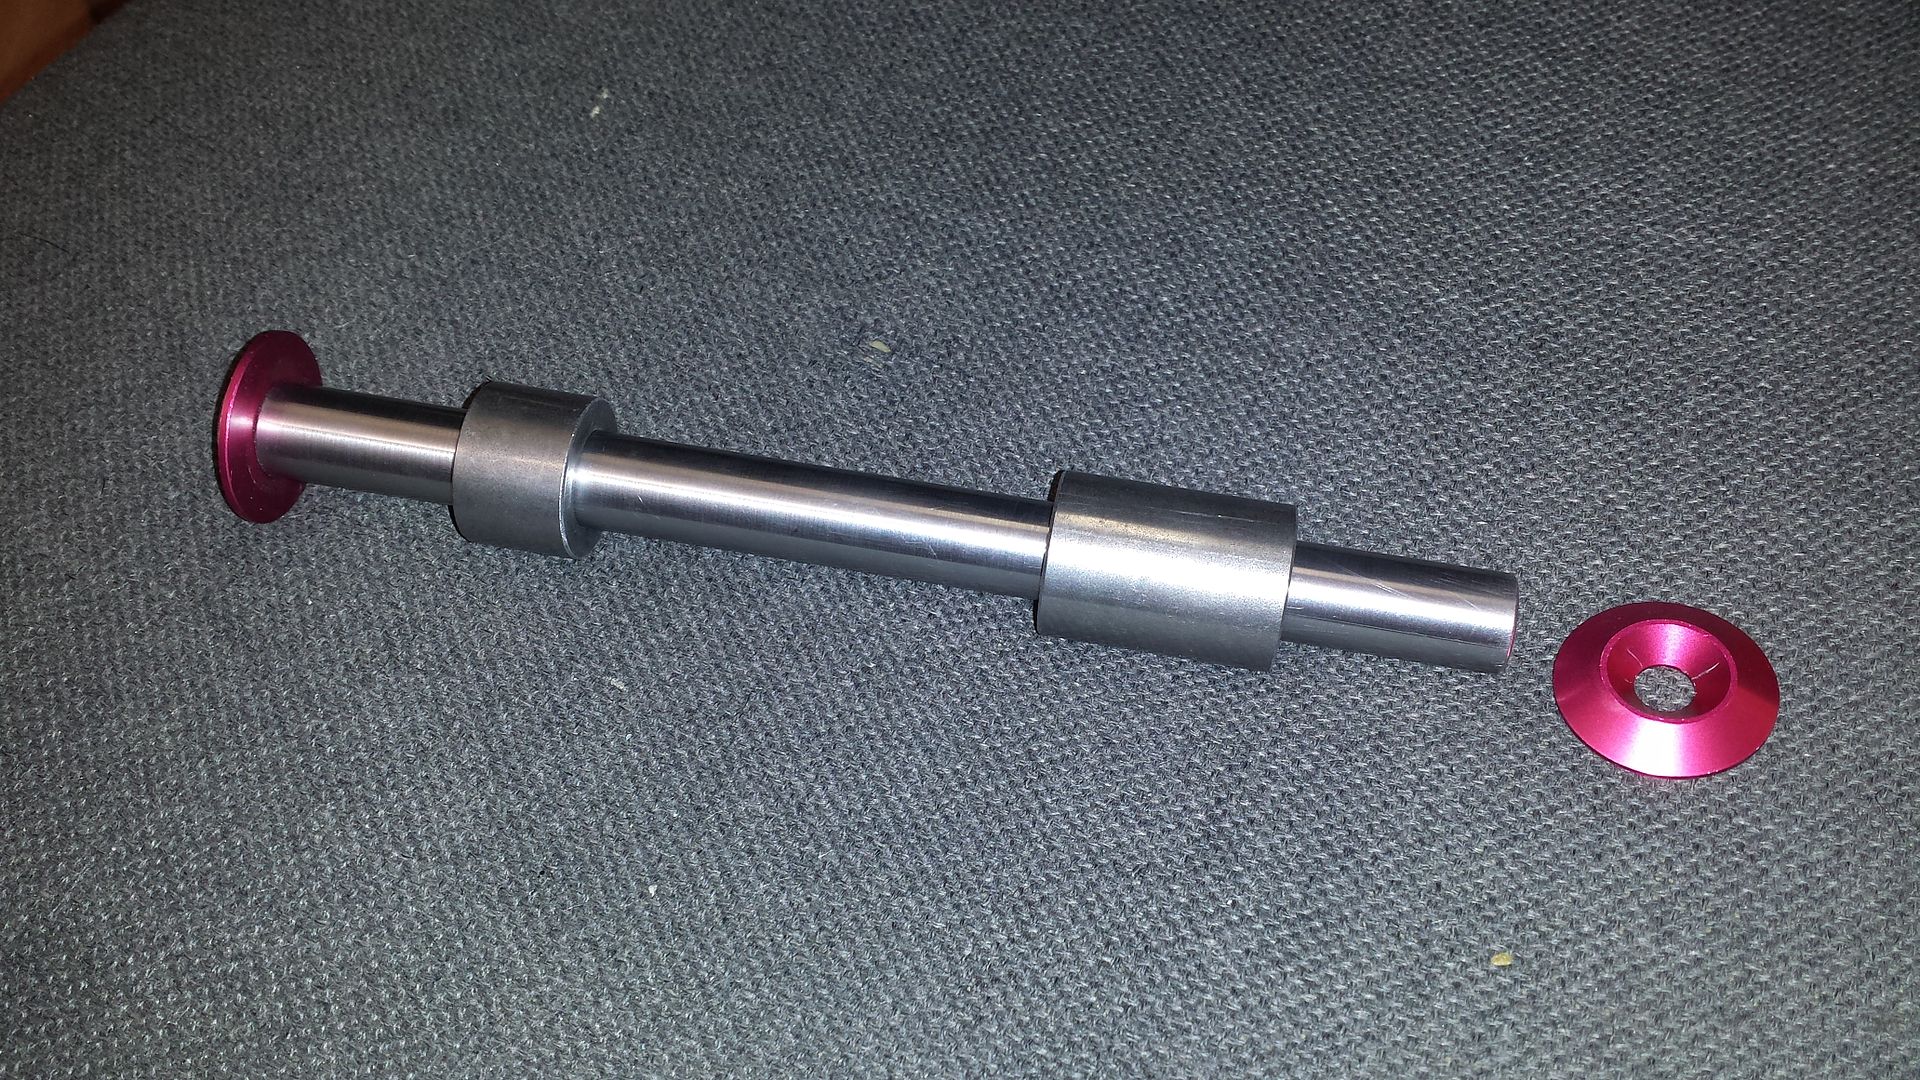
front axle, Im running 15mm front and rear, to make things nice and sleek and create clearance for the suspension I have drilled and tapped the ends, then gone with large countersunk washers to secure it all
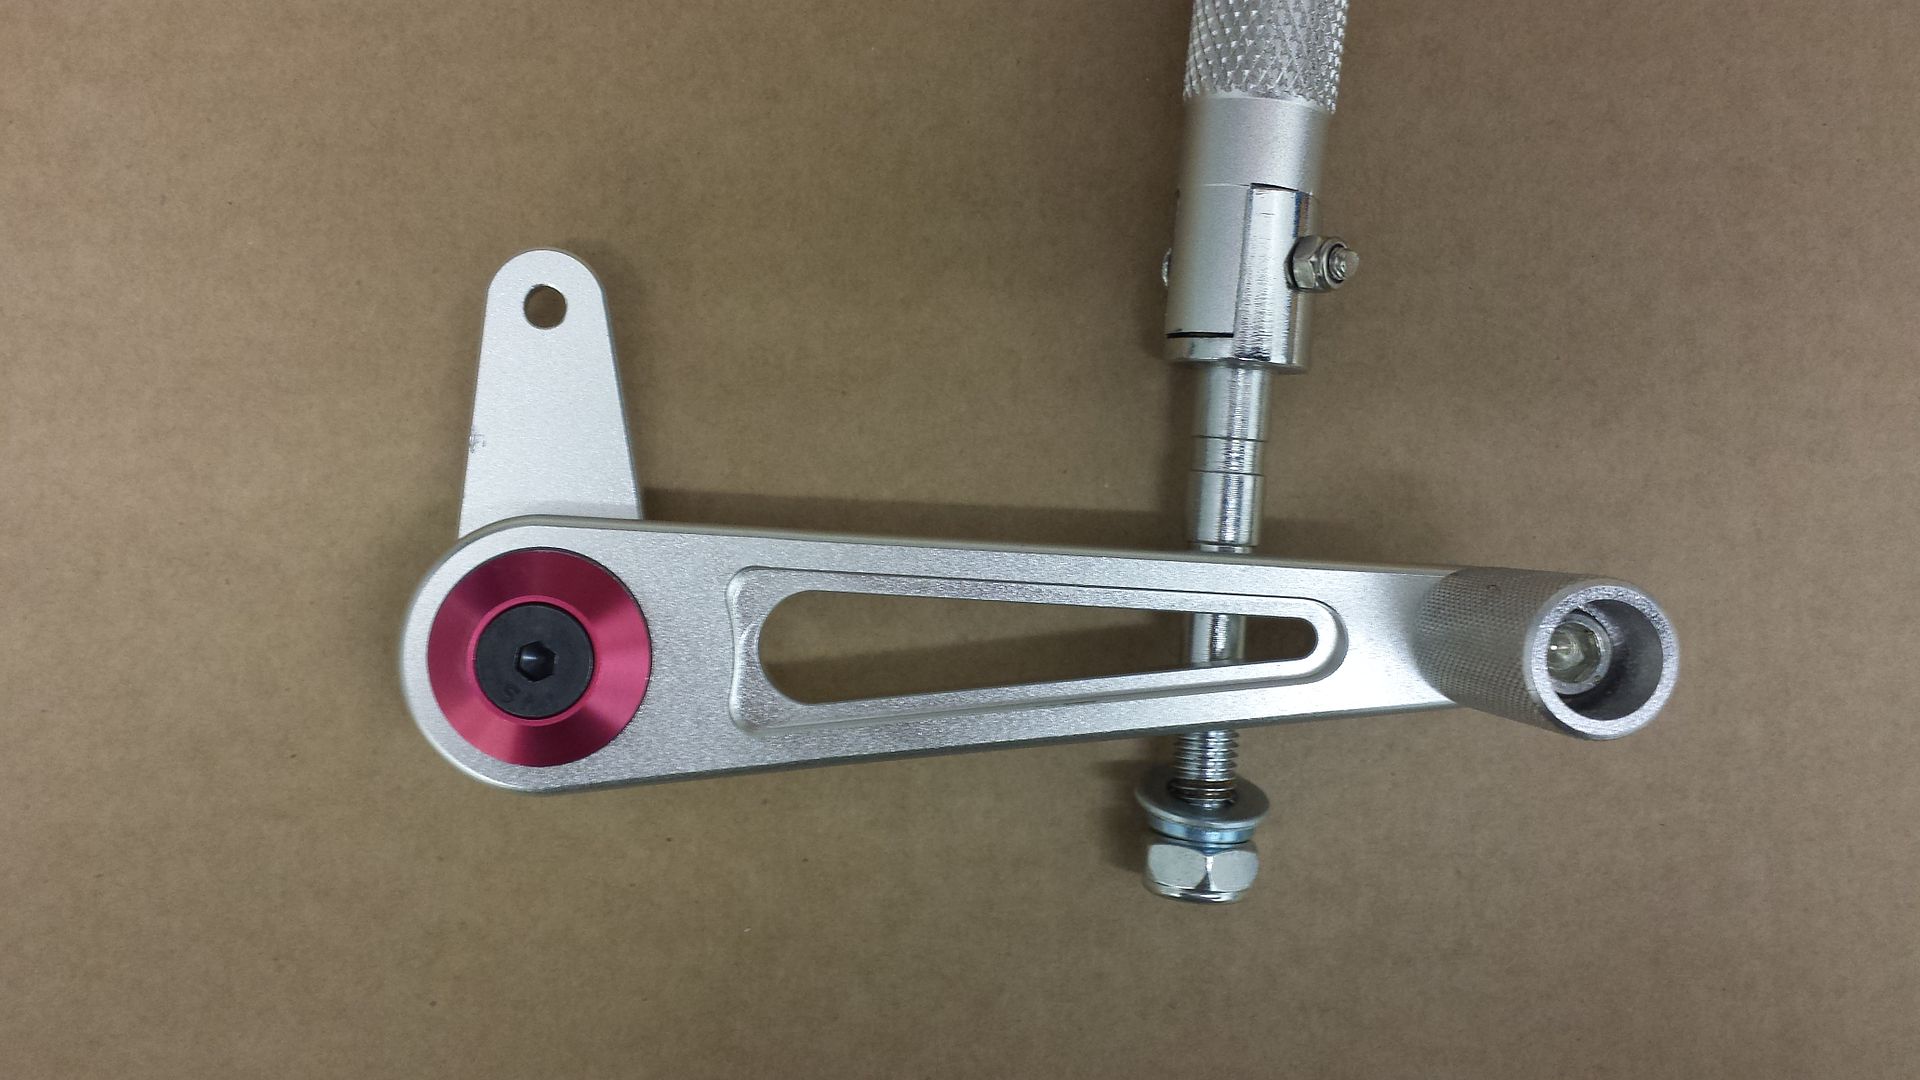
Billet footcontrols, these will be polished then anodised
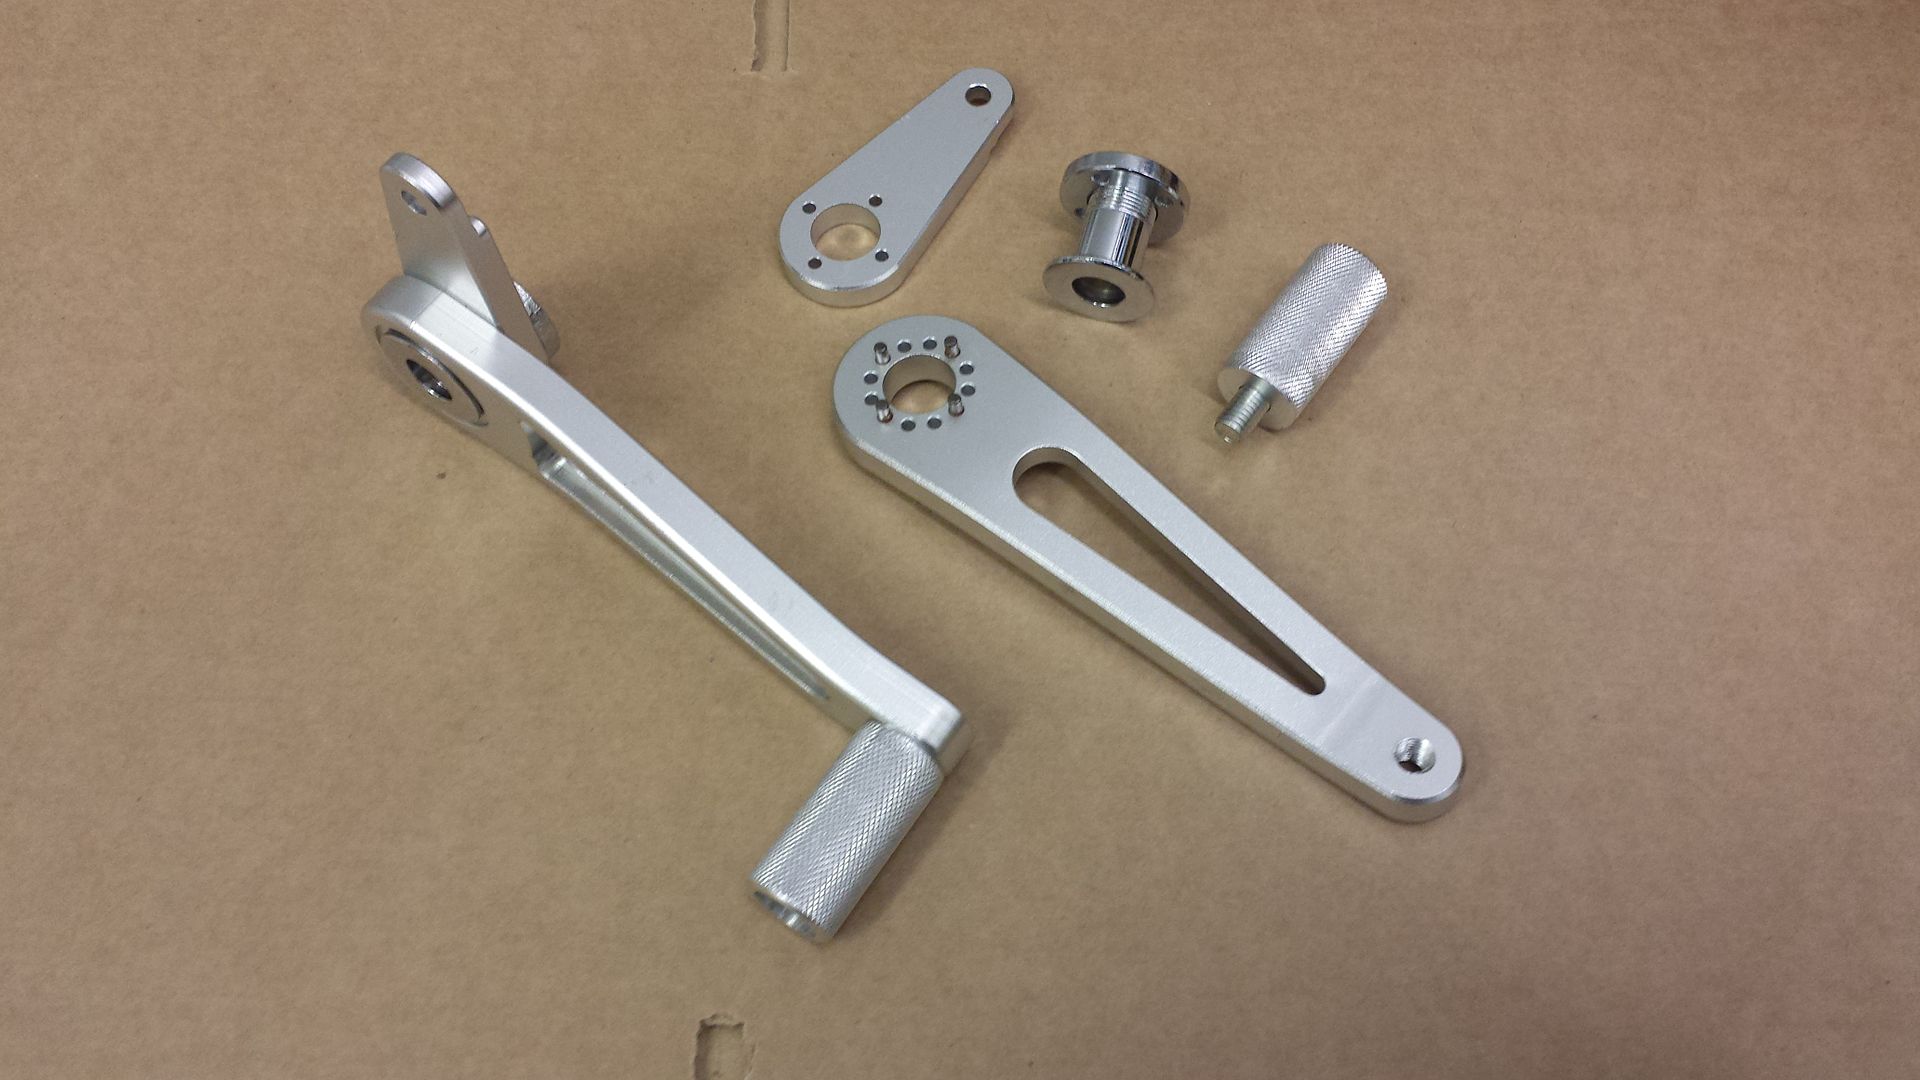
will be fixed to the pivots by same method on the front axle
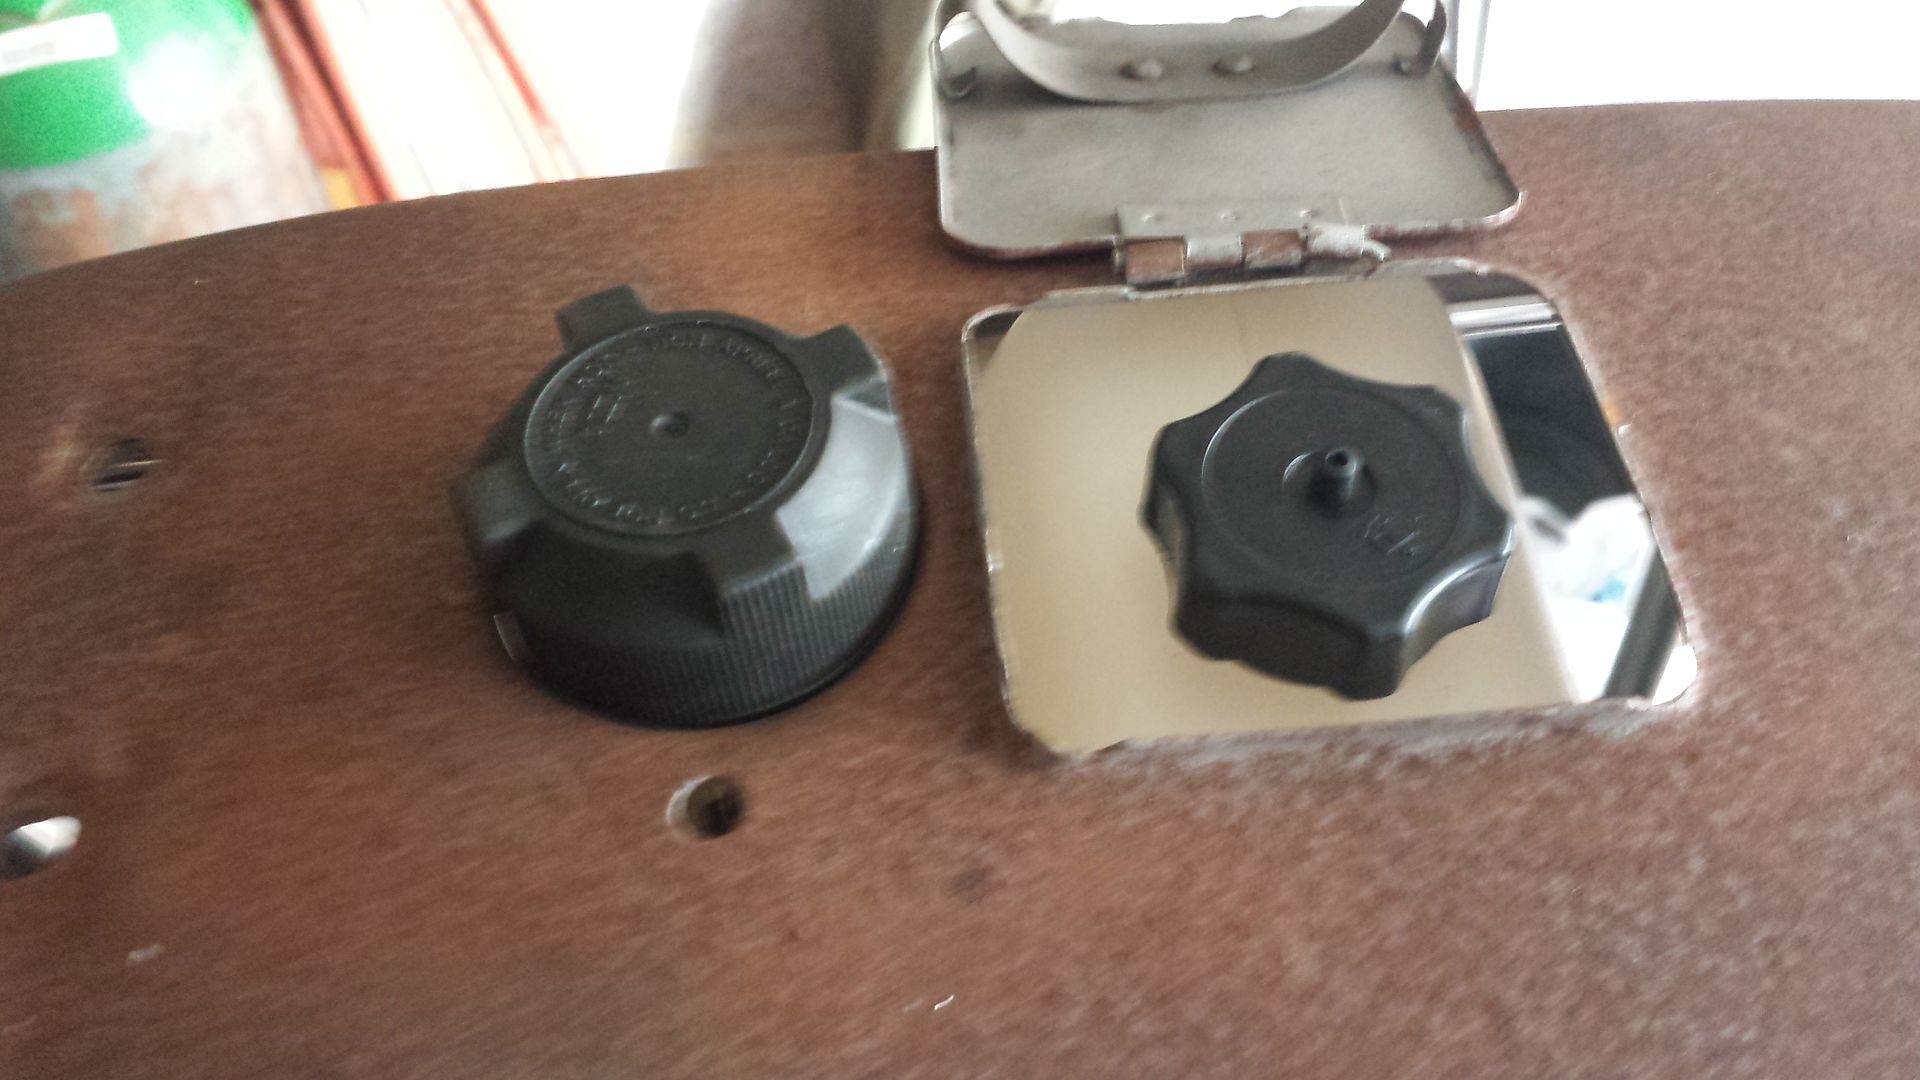
Aprilia RS125 expansion tank was very tidy and cheap from ebay the hole for the air filter wasnt quite big enough inthe loop, so a pieces of 2" dia tube was knocked through, then gradually moved in increasing circles to enlarge the hole and retain the nice rolled lip, the expansion tank cap now sits perfectly through there, and the 2 stroke oil tank will be under the petrol flap
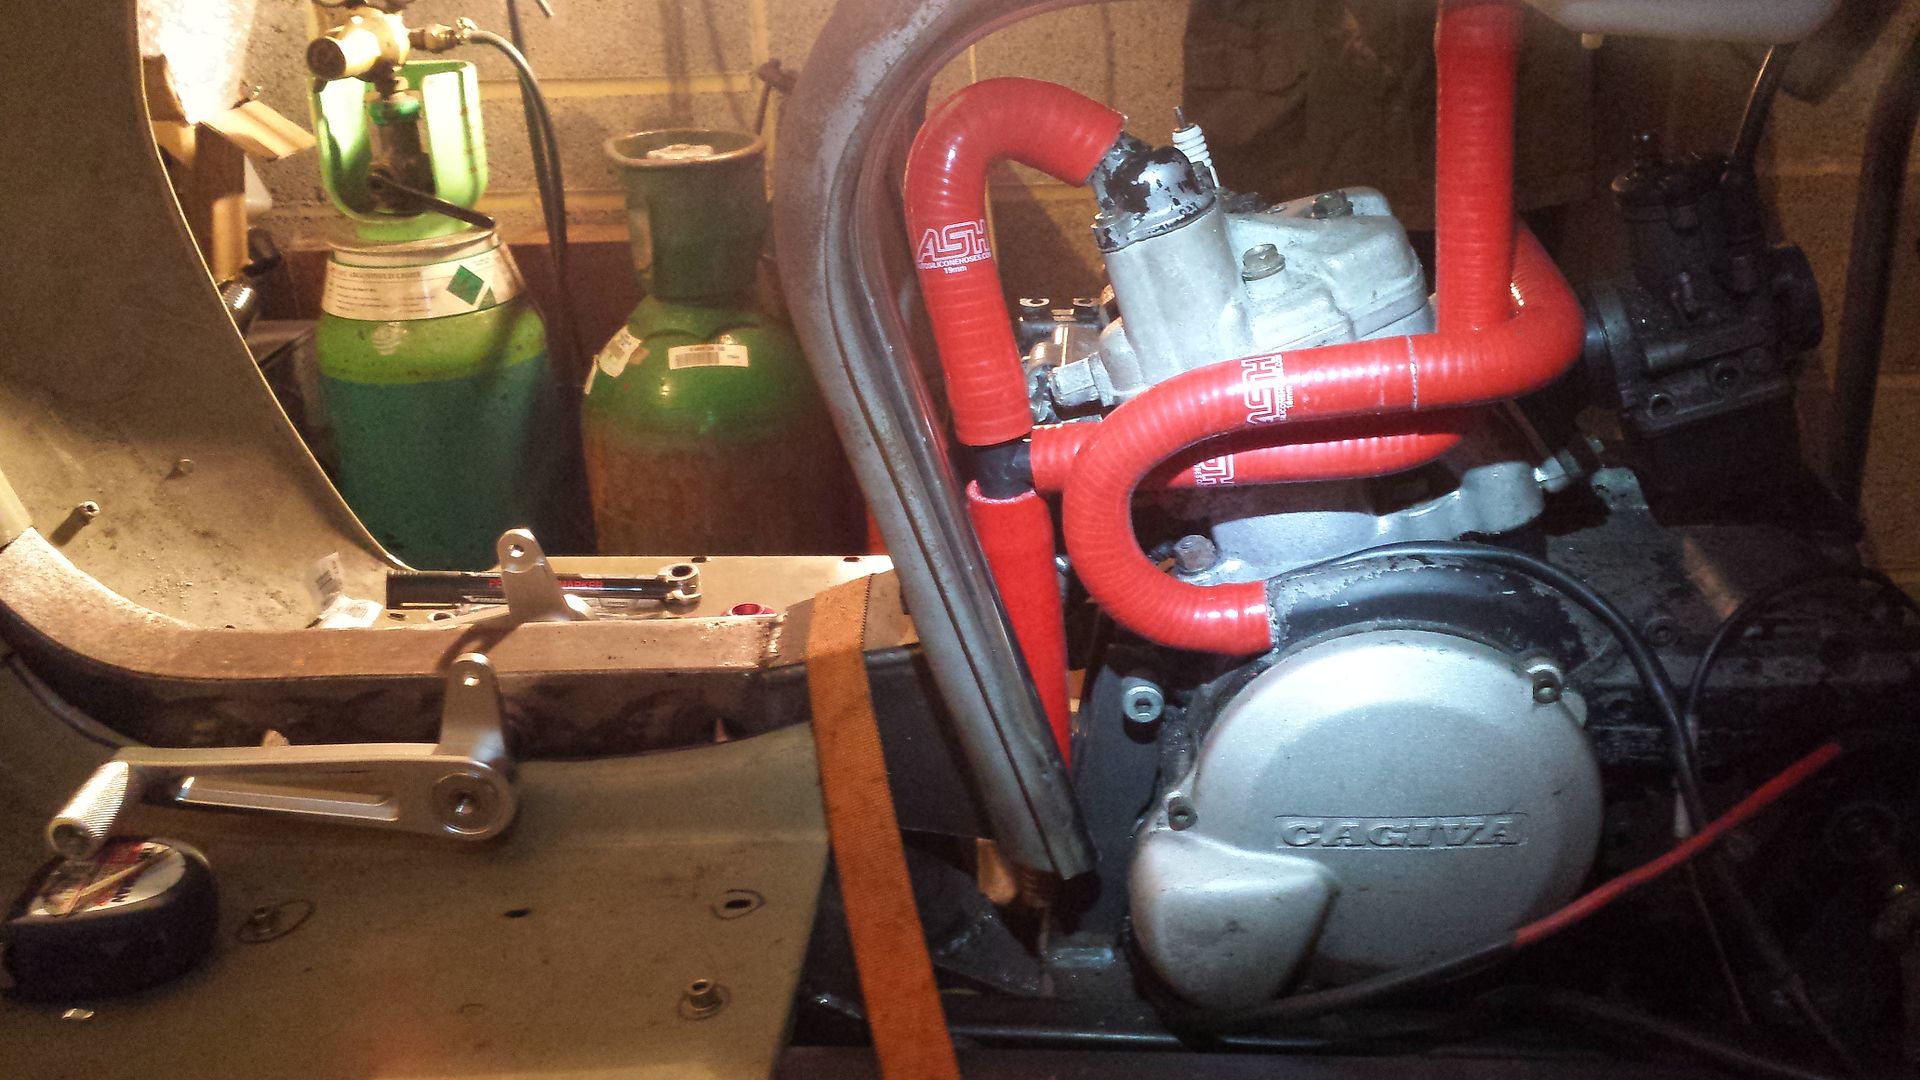
silencer is now all sorted, just need final bracket for the back of the exhaust, sits just how I wanted it

120 front tyre in stock width forks, the bolts for the shocks will be cut down and then fit dome nuts

started on the central heating (them footcontrols are just rested in place, I realise that I couldnt get my foot under them as they are )
dug out the carb last night, well happy as I was about to order another from ebay as I hadnt been able to find this one for about 6 months, lo and behold, last attempt to look and it was just sat on the shelf, in front of tools I have been using????
hmmm dirty nasty, cant be using that
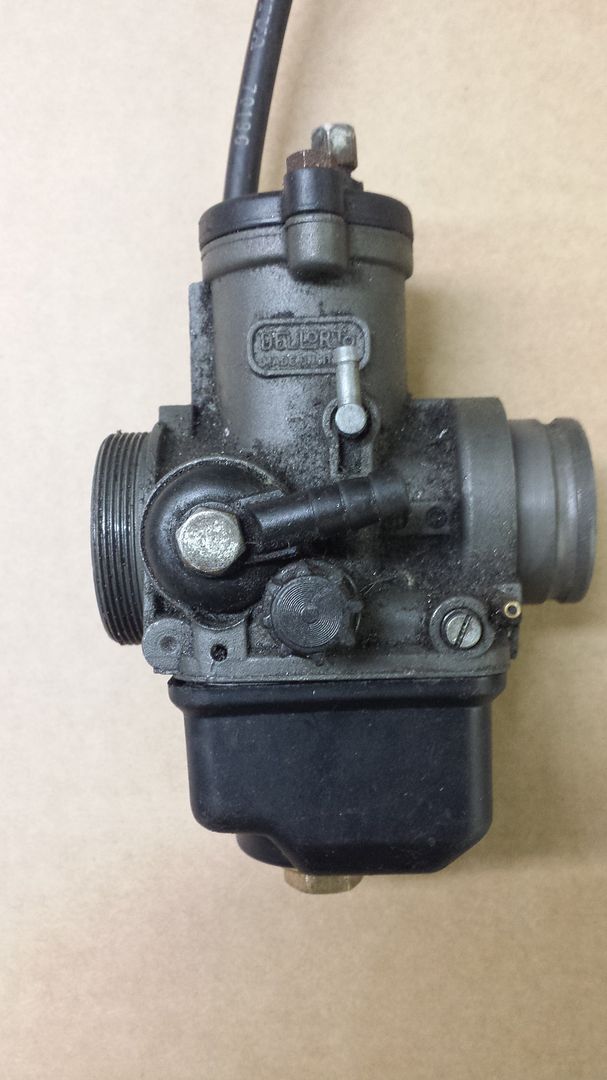
my lunchbreak today didnt involve much food, but I did end up with a carb I could eat my dinner off LOL


220mm front disc, have a 4 pot caliper that Im currently drawing up the carrier for.
Im going with a particular colour on this build, try and guess what it is LOL

front axle, Im running 15mm front and rear, to make things nice and sleek and create clearance for the suspension I have drilled and tapped the ends, then gone with large countersunk washers to secure it all

Billet footcontrols, these will be polished then anodised

will be fixed to the pivots by same method on the front axle

Aprilia RS125 expansion tank was very tidy and cheap from ebay

silencer is now all sorted, just need final bracket for the back of the exhaust, sits just how I wanted it

120 front tyre in stock width forks, the bolts for the shocks will be cut down and then fit dome nuts

started on the central heating

dug out the carb last night, well happy as I was about to order another from ebay as I hadnt been able to find this one for about 6 months, lo and behold, last attempt to look and it was just sat on the shelf, in front of tools I have been using????
hmmm dirty nasty, cant be using that

my lunchbreak today didnt involve much food, but I did end up with a carb I could eat my dinner off

heavy is good, heavy is reliable, and if it does fail, hit them with it!!!
Caps-off Tony! I am stunned by your vision, versitility, expertise and skill-set to whip somthing like this up ....and your access to the equipment to do things in spare moments here and there within the normal life routine. I am looking forward to any future progress reports.
I have a useable Mito Polini big bore kit sat (has been for 3 years now) waiting. My plan was to graft to Lam casing. Still need crank (to mate with Lam crank drive side web) ignition, cdi, powervalve controller, servo and motor. Then to m8 that to a custom loom. Then invest in a Lam drive-train that can handle that.....your build makes a lot more sense in all departments.
About your exhaust and rad arrangements. I think I misunderstood perhaps? A 'centreline' exhaust would run forward under the floorboard presumably? So how could you fit under the floor rads too?
If you can manage the mentioned 'louvres' for the rad air feed it may well be a 1st. and would be a devastating look!
Andy
-
tonydevon
- registered user
- Posts: 553
- Joined: Wed Jun 08, 2011 12:26 pm
- Main scooter: '71 GP125
- Location: Northam, Devonshire
- Contact:
thanks, Im nothing more special than all the other guys out there that knock up stuff in the garage.
I do have the ability to visualise things very easily, I apply a lot of logic and fore thought to my builds, this one for example, I had everything planned and worked out as far as the paintjob, well before I even cut the first bits of steel.
the radiator is going under the floor in a bellypan style affair, have a nice push fan to help keep things cool, will do a nice sheet metal curved top inside the bellypan to push the air down and through the rad, if cooling isn't an issue then I will holesaw a couple of holes in the back to let air bleedout as I am a little concerned what it might do to the handling
Im on stupid small budgets, so things take a long while, and the upshot of this is that I have learnt to do lots of things myself,Im far from a master of all skills,but I can do enough to get by
perfect example is the exhaust,I know that they are expensive to be made, messing with a 2 stroke expansion is silly, so I mocked up the engine with pipe fitted, then built the swingarm assembly around it, all I had to do was measure the stinger, cut it off, make a new one the same length and I have a very good expansion system, that performs as it was designed to do, fits perfectly, and all for just a few quid
the chamber fits like it did on the bike, ground clearance is small about 3.25", that's a problem, but I have made sure that the issues are on the centreline of the chassis, so cornering isn't an issue, and the suspension travel wont allow it to bottom, just have to watch for kerbs and speed bumps.
tonights mission was to gather together all the electronic boxes and servo etc,I dont have a loom or ignition barrel, no point buying them as I wont use them, why waste money.
with some patch leads and odds/ends of wire I soon had the servo making that addictive whirring noise and then a flurry of sparks at the plug, well pleased.
hopefully this weekend I will rig up a test fuel tank and get her running
heavy is good, heavy is reliable, and if it does fail, hit them with it!!!
-
Andy Pickering

- registered user
- Posts: 2172
- Joined: Sun Jan 25, 2009 10:15 pm
- Main scooter: GP
- Location: Hull
- Contact:
Nice nice nice, some cracking work pal, what bolts you using in them front shoCks M16 ? look big but maybe just the size of piccy
Ricspeed, gone but never forgotten RIP my friend #59
-
tonydevon
- registered user
- Posts: 553
- Joined: Wed Jun 08, 2011 12:26 pm
- Main scooter: '71 GP125
- Location: Northam, Devonshire
- Contact:
the shocks are mounted on M12 bolts, I made the links sit out as far as possible and the shocks in and far as possible to reduce the length of the bolts for leverage purposes.
front wheel had to go in the lathe and have the disc mounting surface turned down, the disc was touching the fork leg previously.
the links are cut from solid 1/2" steel (great cheap job done by crazy solutions with his cnc plasma thingy), fully enclosed axle hole, I know that the links on Lambrettas obviously work and wheels dont fall out, but every time I look at them they just remind me of bicycle forks LOL. horrible flashbacks to being a kid wheelying my raleigh and the front wheel coming out LOL
its a game I like to play with finding parts as cheap as possible via ebay etc, then making them fit, rather than paying a fortune for parts that are supposed to fit, although for my builds thats almost impossible to do anyway
I wanted a sidestand for this build, so just kept watching Ebay, then found a brand new stand, removed from a new bike that was built for racing, mounting bracket, spring, cutout switch, £4 the bottom of the stand only had 2 small scratches on it.
all panel work is stock but I have managed to get 1.25-3.5" of extra wheelbase dependant on chain adjuster position, this was in an attempt to try and make it as stable as possible at speed, its only a 125cc at the moment, but if the setup works then I will build another with a more pokey motor. I dont think its going to be a slouch anyway, as a stock bike they are quite nippy, 33bhp 6 speed, or 7 in my spare motor, with the powervalve and all them gears you keep it buzzing and they go ok.
front wheel had to go in the lathe and have the disc mounting surface turned down, the disc was touching the fork leg previously.
the links are cut from solid 1/2" steel (great cheap job done by crazy solutions with his cnc plasma thingy), fully enclosed axle hole, I know that the links on Lambrettas obviously work and wheels dont fall out, but every time I look at them they just remind me of bicycle forks LOL. horrible flashbacks to being a kid wheelying my raleigh and the front wheel coming out LOL
its a game I like to play with finding parts as cheap as possible via ebay etc, then making them fit, rather than paying a fortune for parts that are supposed to fit, although for my builds thats almost impossible to do anyway
I wanted a sidestand for this build, so just kept watching Ebay, then found a brand new stand, removed from a new bike that was built for racing, mounting bracket, spring, cutout switch, £4
all panel work is stock but I have managed to get 1.25-3.5" of extra wheelbase dependant on chain adjuster position, this was in an attempt to try and make it as stable as possible at speed, its only a 125cc at the moment, but if the setup works then I will build another with a more pokey motor. I dont think its going to be a slouch anyway, as a stock bike they are quite nippy, 33bhp 6 speed, or 7 in my spare motor, with the powervalve and all them gears you keep it buzzing and they go ok.
heavy is good, heavy is reliable, and if it does fail, hit them with it!!!

great work keep it up!