
New electronic kit anyone?

Looks really good Richard I'll phone you some time next week for a chat
Absolutley amazing stuff, love it Rich.
-
Rich_T
- Dealer
- Posts: 540
- Joined: Fri May 29, 2009 8:07 pm
- Main scooter: Li Special
- Location: Birmingham
- Contact:
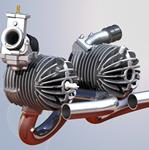
Getting ever closer, The fans and stators are now fully machined. These pictures we taken this afternoon before the parts went for anodising and plating.
You can see the assembly of the Aprilia windings on the stator and the fan locating on the flywheel rivits and secured with 3 counter sunk M6 screws. Flywheel extraction is achieved with the original aprilia puller (cheap on Ebay).
The lever next to the pickup is the timing adjustment, these are plated steel (I might switch to SS later). The back of the pickup and the adjustment lever protrude through the hole in the mag housing. The lever can be accessed from the front of the fan cowl where the pickup can be adjusted and the position externally marked on the fan cowl.
-
sean brady scooters

- Dealer
- Posts: 2040
- Joined: Mon Jan 05, 2009 12:09 pm
- Location: Ripon, North Yorkshire
- Contact:
wow ,that looks fantastic 
Sean Brady Scooters - 01765 690 698
is the lever thing like a special spanner to save your fingers and is removed after adjustment??
Its in bits scooter club: www.facebook.com/groups/132415046859320
-
soulsurfer

- registered user
- Posts: 2539
- Joined: Thu Jan 08, 2009 2:43 pm
- Location: The Garden Of England
- Contact:
Hi Rich, this looks interesting, but I have a few questions...
What's the smallest capacity battery that can be used? (e.g. could it be a 1.2Ah solid state type?)
Do you have a picture of the modified mag housing?
Why isn't it compatible with existing looms? (Cable thickness required for additional power??)
I assume the integrated guage functions are only available from a retrofit dashboard from the Aprillia?
I'm a bit (very) confused on costings and what's included, particularly with the "off the shelf" option. You say the "Off the shelf" option includes buying donor parts from eBay at a cost of £95-£140, is this an additional cost to the £350/£466. What parts are they and can't they be supplied as a complete kit?
I assume this system would negate the need to carry ignition spares such as stators, regulators and coils?
Oh, and the most important factor, what colour is the anodising?
Thanks
Last edited by soulsurfer on Tue Apr 19, 2011 9:07 pm, edited 1 time in total.
Turn On, Tune In, Cop out!
-
Wayne Miller
- registered user
- Posts: 345
- Joined: Wed Jan 07, 2009 12:52 pm
- Main scooter: Vespa 50 Special (Rotax Proto)
- Location: Rothwell, Northants
- Contact:
Cool Job Rich. I thought about doing this when I modified my smallframe engine to mount a Rotax barrel from the RS125. I opted for the easy way and got a vespatronic (still got dodgy lights). Do the lights stay on with the engine off with this ignition/loom set up? I love the stator and the fan that bolts onto the original flywheel. The Rave unit is only good for blade type powervalves by the way. I think it opens and closes again low down rpm to clean the blade and then opens again around 8000rpm and stays open. A variable powervalve like used on the DAC's wont be able to use the Aprilia RAVE unit however Ignitech powervalve control units are great and can be configured to do what the hell you like. I guess they could make a plug and play for your loom as I guess its based on the Aprilia loom.
Top work yet again
Top work yet again
Stay tuned..............
-
Rich_T
- Dealer
- Posts: 540
- Joined: Fri May 29, 2009 8:07 pm
- Main scooter: Li Special
- Location: Birmingham
- Contact:
Wayne, there are a couple of Aprilia race systems where you can control the powervalve operation. You are right, this is for solenoid operated powervavles however, it may also be possible to operate other solenoid devises from this unit, such as power jets etc. Power valves are so uncommon on Lambretta engines, I'm not going to get involved in developing something for every system out there, and I don't expect many street bike to use them although a couple of racers have expressed an interest.
The loom I worked out isolates all the power from the headset key switch (the build manual covers how to control high current accessories with this configuration) This means, once your key is out no accidental drained batteries or jokers pressing your buttons.
Mike, Not sure on the smallest battery, I take the line that it would be best at this stage to follow the Aprilia lead. It isn't compatible with standard looms because it is capable of carrying circa 15-20amps of current in each of the main loom wires. Get something wrong with the engine running and you're looking at grounding circa 35amps. lambretta looms have no ratings on them (at best the India looms are about 8amps on the brown wire), the wires are all wrong and the electronics need totally different feeds (there is 21m of wire in the Top spec loom). There is also the small factor of all the multi connectors wire colours and pin outs, it absolutely has to be a bespoke loom for the job (remember we spoke about reliability and controlling the variables, well this is it). To do a professional job it also has to look right too, this mean right specification, right materials and right tools.
The costs are split into three sections OTS (off the shelf), DIY and the donor parts. When ever you produce something, someone always thinks they can save a couple of quid and get it on the cheap. To cover this base, I list out the parts you absolutely have to have to build according to your plan (OTS or DIY). Additional to this are the donor parts, and these can vary acording to your build specification (I put forward 3 specifications, Restoration, Sprint and Top spec). No point in having clocks on a restoration (but you do want spot lights/Alpines etc) so the Ebay bill of materials is less for a restoration spec than a Sprint spec that does have clocks.
The bottom line is, I'm not getting involved is sourcing parts from Ebay (there are all sorts of reasons for this). sourcing the donor parts is up to the builder, all I need is the connectors from the loom. The manual covers all the costs and configuration options very well (I'l release it a little later). As a taster, if you built a scooter to the restoration spec and sent me the flywheel and loom connectors, I would return a full kit of parts to build for £280.81 (not including the ebay costs for CDI, coil, loom, flywheel, stator windings, pickup, mag flange and rectifier). The £280.81 would include, new loom, stator plate, modified mag flange, modified flywheel, fan, fixing screws, pickup pointer and spacer washer. The estimate for the donor parts that YOU would have to procure would be around £124. This means you would have expected costs for the build of £404.81 . If you went the DIY route the essential parts from me would be £147 and the donor parts £124 (if you got lucky it could be a lot less, I based it on "Buy it now" prices) total cost £271. Adding the clocks and all the functionality that comes with it is only £30 on your Ebay bill (you get far more bang for your buck with the Sprint option). I've explained it as best I can, short of posting the manual which has a price matrix that breaks it all down.
Anodising is red (it's faster Mike).
Ricspeed, the lever is not a spanner. It is a way of making two captive nuts fixed to a lever (one piece of 5mm laser cut steel). Once tightened, it fixes the pickup in position. It sticks out of the back of the mag flange (about 10mm) at about the 5 O'clock position and is visible as a small tag with an arrow lasered on it (it is not obtrusive). This means you can use this as a position indicator for your timing. Should it require adjustment you need only loosen the M6 hex nuts from the back and slide the lever to the new position and lock it up again (there is no need to even remove the fan cowling, everything is accessed through the hole in the mag flange).
-
Wayne Miller
- registered user
- Posts: 345
- Joined: Wed Jan 07, 2009 12:52 pm
- Main scooter: Vespa 50 Special (Rotax Proto)
- Location: Rothwell, Northants
- Contact:
What I meant to say Rich was that with this set up do your lights come on without the engine running? ie taking a feed from the battery.Rich_T wrote:The loom I worked out isolates all the power from the headset key switch (the build manual covers how to control high current accessories with this configuration) This means, once your key is out no accidental drained batteries or jokers pressing your buttons
Its something that I wanted on my smallframe when I was thinking about using the aprilia set up. I hate scooter headlights and thought that if I used the aprilia system then this would have resolved this issue. Are the lights way better than before when using your system?
ps I think your prices are quite reasonable considering what the advantages and possibilitys are with this system. Good luck
Stay tuned..............
i see ...you put the spanner in the same slot as the lever and the bolt heads are on the under side
so .....what would the basic diy kit consist off then ....base,fan and lever thingy ???
so .....what would the basic diy kit consist off then ....base,fan and lever thingy ???
Its in bits scooter club: www.facebook.com/groups/132415046859320