
Virtually nothing could be saved from the original frame, too badly damaged or rusted completely, besides the frame loop that I straightened out and repaired, the air scoop, petrol flap, rear light housing and toolbox door were the only things I could repair and use.
The engine is an Li125 1963 completely reworked and repaired, usual stud repairs (heli-coiled or over size tapped out) Fitted a later model chaincase with strengthening ribs, had a lot of problems with kick start shafts, had one snap on splined end, got a repro SX kick start.
Drive side has 47/18 sprockets, Teflon tensioner, new chain, clutch sprocket is lightened and recessed, SX150 gearbox, 5-plate 10x spring clutch, new bearings/seals. BGM Stator, Rectifier and CDI unit, SIL Flywheel (you may remember I'd stripped the flywheel nut
Also removed the stainless steel petrol tap lever guide as found it was interfering with its function replaced it with standard rubber, perfect. Also changed the fast-flow tap for a rearward facing one with warning light, also wired in with two lights, works beautifully, fitted just under double leg shield at the top.
She's also fitted with S2 TV175 front forks and dampers, S1 tyres, TV drop handles bars, new design combined 4 in 1 backrest, Ancillotti seat, Stainless steel Double leg shield trim.
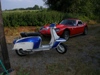
Still changing bits and bobs but she rides ok, bit smoky for some reason, using 3% mix fully synth SIP oil, completed 50 mls without hitch, little bit boggy but haven't run in yet so bit difficult to sort out, so here she is again, nearly finished but on the road at last!!!
[URL=http://s776.photobucket.com/user/b ... .jpg[/img][/url]
[URL=http://s776.photobucket.com/user/b ... .jpg[/img][/url]
[URL=http://s776.photobucket.com/user/b ... .jpg[/img][/url]
[URL=http://s776.photobucket.com/user/b ... .jpg[/img][/url]
[URL=http://s776.photobucket.com/user/b ... .jpg[/img][/url]
[URL=http://s776.photobucket.com/user/b ... .jpg[/img][/url]
[URL=http://s776.photobucket.com/user/b ... .jpg[/img][/url]
[URL=http://s776.photobucket.com/user/b ... .jpg[/img][/url]
[URL=http://s776.photobucket.com/user/b ... .jpg[/img][/url]
[URL=http://s776.photobucket.com/user/b ... .jpg[/img][/url]
[URL=http://s776.photobucket.com/user/b ... .jpg[/img][/url]
[URL=http://s776.photobucket.com/user/b ... .jpg[/img][/url]
[URL=http://s776.photobucket.com/user/b ... .jpg[/img][/url]
[URL=http://s776.photobucket.com/user/b ... .jpg[/img][/url]
[URL=http://s776.photobucket.com/user/b ... .jpg[/img][/url]
[URL=http://s776.photobucket.com/user/b ... .jpg[/img][/url]
[URL=http://s776.photobucket.com/user/b ... .jpg[/img][/url]
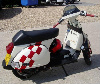
well she's almost there.... changing things as I go along, but she is on the road, looking forward to next project

![[URL=http://s776.photobucket.com/user/b ... .jpg[/img]](%5BURL=http%3A//s776.photobucket.com/user/berniedalton1/media/KGrHqVHJEgE916EzziGBPm7rtc60_12_zps4a074771.jpg.html%5D%5Bimg%5Dhttp://i776.photobucket.com/albums/yy46/berniedalton1/KGrHqVHJEgE916EzziGBPm7rtc60_12_zps4a074771.jpg%5B/img%5D)
![[URL=http://s776.photobucket.com/user/b ... .jpg[/img]](%5BURL=http%3A//s776.photobucket.com/user/berniedalton1/media/KGrHqJHJBYE9uJLnmy4BPm7q4ItK60_12_zpsf478f4d0.jpg.html%5D%5Bimg%5Dhttp://i776.photobucket.com/albums/yy46/berniedalton1/KGrHqJHJBYE9uJLnmy4BPm7q4ItK60_12_zpsf478f4d0.jpg%5B/img%5D)
![[URL=http://s776.photobucket.com/user/b ... .jpg[/img]](%5BURL=http%3A//s776.photobucket.com/user/berniedalton1/media/KGrHqNHJDME91Hu11BPm7qUM2gg60_12_zps9e80eff9.jpg.html%5D%5Bimg%5Dhttp://i776.photobucket.com/albums/yy46/berniedalton1/KGrHqNHJDME91Hu11BPm7qUM2gg60_12_zps9e80eff9.jpg%5B/img%5D)
![[URL=http://s776.photobucket.com/user/b ... .jpg[/img]](%5BURL=http%3A//s776.photobucket.com/user/berniedalton1/media/KGrHqFHJCUE9qiKtE2BPm7wf-4w60_12_zps997f7f1e.jpg.html%5D%5Bimg%5Dhttp://i776.photobucket.com/albums/yy46/berniedalton1/KGrHqFHJCUE9qiKtE2BPm7wf-4w60_12_zps997f7f1e.jpg%5B/img%5D)
![[URL=http://s776.photobucket.com/user/b ... .jpg[/img]](%5BURL=http%3A//s776.photobucket.com/user/berniedalton1/media/KGrHqNo0E-0FLfrBPye2QE9Q60_12_zps57191328.jpg.html%5D%5Bimg%5Dhttp://i776.photobucket.com/albums/yy46/berniedalton1/KGrHqNo0E-0FLfrBPye2QE9Q60_12_zps57191328.jpg%5B/img%5D)
![[URL=http://s776.photobucket.com/user/b ... .jpg[/img]](%5BURL=http%3A//s776.photobucket.com/user/berniedalton1/media/KGrHqRpwE-Y0FdzcBPye0R54Q60_12_zps8f800bbd.jpg.html%5D%5Bimg%5Dhttp://i776.photobucket.com/albums/yy46/berniedalton1/KGrHqRpwE-Y0FdzcBPye0R54Q60_12_zps8f800bbd.jpg%5B/img%5D)
![[URL=http://s776.photobucket.com/user/b ... .jpg[/img]](%5BURL=http%3A//s776.photobucket.com/user/berniedalton1/media/20130706_083958_zpsb1437fe5.jpg.html%5D%5Bimg%5Dhttp://i776.photobucket.com/albums/yy46/berniedalton1/20130706_083958_zpsb1437fe5.jpg%5B/img%5D)
![[URL=http://s776.photobucket.com/user/b ... .jpg[/img]](%5BURL=http%3A//s776.photobucket.com/user/berniedalton1/media/20130505_155054_zps1fa6ec7b.jpg.html%5D%5Bimg%5Dhttp://i776.photobucket.com/albums/yy46/berniedalton1/20130505_155054_zps1fa6ec7b.jpg%5B/img%5D)
![[URL=http://s776.photobucket.com/user/b ... .jpg[/img]](%5BURL=http%3A//s776.photobucket.com/user/berniedalton1/media/20131201_113125_zps005b94c2.jpg.html%5D%5Bimg%5Dhttp://i776.photobucket.com/albums/yy46/berniedalton1/20131201_113125_zps005b94c2.jpg%5B/img%5D)
![[URL=http://s776.photobucket.com/user/b ... .jpg[/img]](%5BURL=http%3A//s776.photobucket.com/user/berniedalton1/media/20131201_113108_zpsdc0f1ff7.jpg.html%5D%5Bimg%5Dhttp://i776.photobucket.com/albums/yy46/berniedalton1/20131201_113108_zpsdc0f1ff7.jpg%5B/img%5D)
![[URL=http://s776.photobucket.com/user/b ... .jpg[/img]](%5BURL=http%3A//s776.photobucket.com/user/berniedalton1/media/20130511_103749_zps8f1815a2.jpg.html%5D%5Bimg%5Dhttp://i776.photobucket.com/albums/yy46/berniedalton1/20130511_103749_zps8f1815a2.jpg%5B/img%5D)
![[URL=http://s776.photobucket.com/user/b ... .jpg[/img]](%5BURL=http%3A//s776.photobucket.com/user/berniedalton1/media/20130406_155234_zps563cd66f.jpg.html%5D%5Bimg%5Dhttp://i776.photobucket.com/albums/yy46/berniedalton1/20130406_155234_zps563cd66f.jpg%5B/img%5D)
![[URL=http://s776.photobucket.com/user/b ... .jpg[/img]](%5BURL=http%3A//s776.photobucket.com/user/berniedalton1/media/20130505_155108_zps07a07600.jpg.html%5D%5Bimg%5Dhttp://i776.photobucket.com/albums/yy46/berniedalton1/20130505_155108_zps07a07600.jpg%5B/img%5D)
![[URL=http://s776.photobucket.com/user/b ... .jpg[/img]](%5BURL=http%3A//s776.photobucket.com/user/berniedalton1/media/20131201_113221_zps04edff85.jpg.html%5D%5Bimg%5Dhttp://i776.photobucket.com/albums/yy46/berniedalton1/20131201_113221_zps04edff85.jpg%5B/img%5D)
![[URL=http://s776.photobucket.com/user/b ... .jpg[/img]](%5BURL=http%3A//s776.photobucket.com/user/berniedalton1/media/20131201_113056_zpsf3d883a2.jpg.html%5D%5Bimg%5Dhttp://i776.photobucket.com/albums/yy46/berniedalton1/20131201_113056_zpsf3d883a2.jpg%5B/img%5D)
![[URL=http://s776.photobucket.com/user/b ... .jpg[/img]](%5BURL=http%3A//s776.photobucket.com/user/berniedalton1/media/20140606_145744_zpsf8ac7ec0.jpg.html%5D%5Bimg%5Dhttp://i776.photobucket.com/albums/yy46/berniedalton1/20140606_145744_zpsf8ac7ec0.jpg%5B/img%5D)
![[URL=http://s776.photobucket.com/user/b ... .jpg[/img]](%5BURL=http%3A//s776.photobucket.com/user/berniedalton1/media/20140606_145757_zpsddd09ea1.jpg.html%5D%5Bimg%5Dhttp://i776.photobucket.com/albums/yy46/berniedalton1/20140606_145757_zpsddd09ea1.jpg%5B/img%5D)